
- Support
- How to Set Up a VPN on Mac
- User guide for personalVPN™ Mac App
For macOS 10.14 (Mojave) only.
This guide is for legacy users, using our old Mac OS software (version 2) on Mojave. (Usually not recommended for Mojave).
For most Mac OS 10.14 (Mojave) users, we have a newly designed, greatly enhanced, Mojave-optimized beta app (version 3). Some new features in this version include: Kill Switch, smart gateway detection, last gateway memory, and more. This version does not yet support custom gateways, but will in later versions.
To download and install the latest MacOS Beta, version 3:
Log into your customer account
On your dashboard click "Downloads/Setup"
Click MacOS BETA to begin the download.
After the file finishes downloading, run the file, and follow the prompts to finish the installation.
For any feedback or comments about the Beta software, please email support@witopia.net
If for some reason you must use the legacy software, version 2, please continue reading below.
Please note, before you begin: If at any point you get a prompt to do a Software Update to version 2.4.6, click Skip This Version; version 2.4.6 will NOT work with macOS 10.14/Mojave.
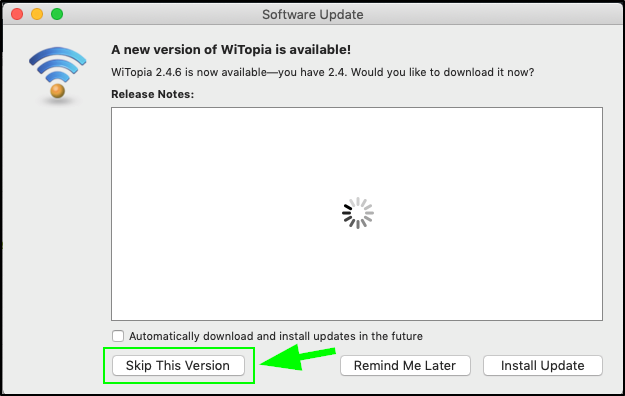
Make sure the “Automatically download […]” box is NOT checked.
1. Log into your account here. From your dashboard Go To: Downloads/Setup > Click the macOS button. The personalVPN app for macOS 10.14 will download to your desktop.
2. If you already had the WiTopia personalVPN app installed previously: Go to your FINDER* > Applications folder > Drag the WiTopia app from there to the trash > and empty the trash** to remove the existing app.
* Please, do not drag the app from your LAUNCHPAD. You must go to FINDER first, and then the Applications folder to drag the old WiTopia app from there to the trash.
** If the trash is not emptied, this will not work!
Then, run the personalVPN.pkg that you just downloaded to your Downloads folder. Follow your system’s prompts to install the app.
3. When you launch the app, you may get the following prompt:
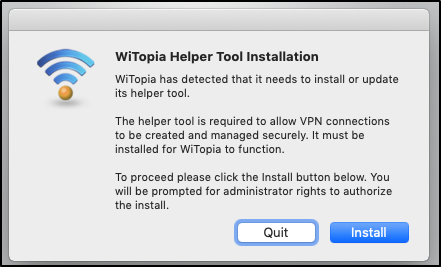
Click Install and the process will likely FAIL the first time, with the following message:*
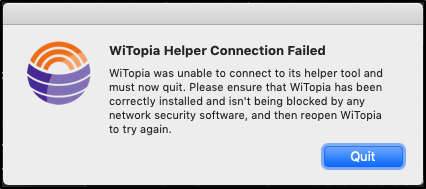
– if so that is OK - proceed to step #4.
* If you do NOT get this prompt, or the Helper Tool installation is successful – you’re done, and you can start using the app right away!
4. If you got the Helper Tool prompt from step #3 and the WiTopia Helper Connection Failed… Open Finder and click: Go > Go to Folder…
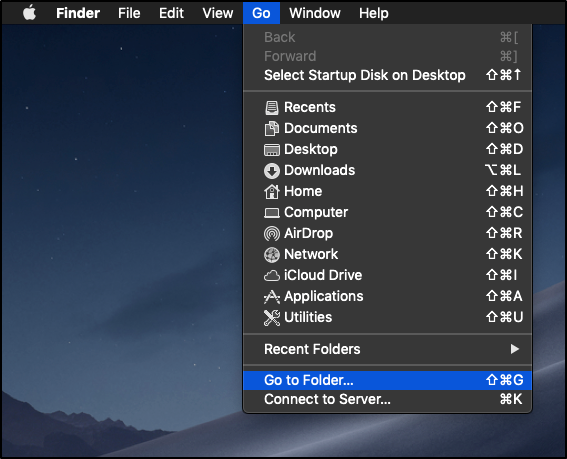
5. In the “Go to Folder” field, enter: /Library/PrivilegedHelperTools
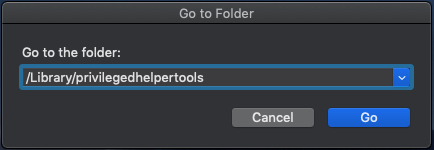
Click Go
6. In this folder, select the file: net.witopia.WiTopiaHelper
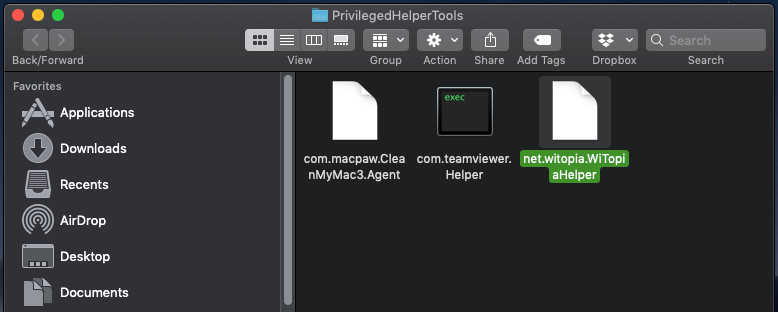
Drag this file to your trash, and empty your trash.
7. Then, go to your Applications folder, and Run the WiTopia.app again. You should get the WiTopia Helper Tool Installation prompt again. Click Install. Once this installs successfully, you’re done, and the app is ready to use!
Final notes: If you get the following message…
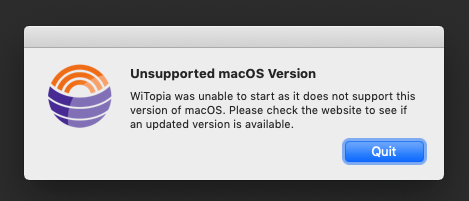
This indicates something didn’t go right and you still have the incorrect version of our software for Mojave – Please go to step #1 of this guide and give her another try.
Have more questions? Let us know how we can help you.